I Add a Ridge Vent
To top off my project I added a ridge vent. That is sort of a pun, but to the nature of this roofing project it really was the last thing I did and it was at the top of the roof. Well, I did reinstall the lightning rod after that, but that was more in the nature of cleanup.
My roof already had a stamped metal roof vent. I probably should have removed this for aesthetic reasons, but that would have meant repairing the hole in the sheathing so laziness took over. I simply kept the existing vent in place and painted it to match the new roof colors.
I wanted to add to the roof’s venting by adding a ridge vent because I recognized the inherent superiority of this type of vent.
Heat will naturally rise and a series of vents running the length of the ridge will ventilate the roof much better than a few holes placed part way up the roof. This roof repair was a perfect time to make this happen.
Good ventilation is important to a roof. A vented roof will last longer, prevent ice dams in winter, and keep the house cooler in summer.
I didn’t do anything until I had shingled my way up to the ridge area. I stopped a few courses below the ridge and removed all the existing shingles along the ridge. I then went inside my attic and drilled holes into the sheathing to allow me to start a reciprocating saw. My roof did not have a ridge pole, nor did it use plywood or OSB. This is old construction and it used planks of wood as sheathing. The joists running under the planks met at the top without a ridge board. This meant that in some cases I could remove an entire plank to create the vent.

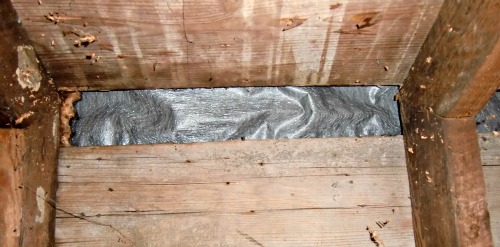
The pictures above shows the roof sheathing it after it the hole has been covered up with the ridge vent. What you are seeing is the mesh fabric that keeps bugs out of the attic.
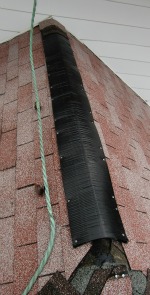
The vent is simply a single layer of corrugated plastic with another couple of layers of corrugated plastic staked to the sides. This creates a covering on top and air flow on the sides. To prevent bugs from entering a layer of fine mesh covers the bottom layer. See the picture below.


The vent is nailed directly to the roof, but extra long nails are needed to penetrate the multiple layers of corrugation, shingle, felt and sheathing. After I nailed the vent in place I shingled the top ridge much as I did the raking ridges. I simply created ridge shingles by cutting my three-tab shingles into one-tab shingles. These also needed extra long nails, since the nails had to secure into the wood through the corrugated plastic vent.
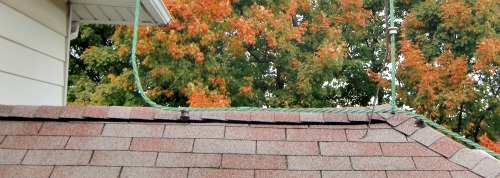
You can always tell a vented ridge. It will have a slight gap between the ridge and the roof, and the ridge will be a little more rounded than it would be otherwise.
When I bought my vent at Lowes there were two to choose from. One was 14 inches wide and one was 12 inches wide. Since my tabs were 12 inches wide I chose the thinner. Be aware that not all ridge vents will work with your shingles and choose accordingly.

The view after completion. One lightning rod insulator still needs to be secured. Note the shadow line which will always give away a ridge vent.
Please!


New! Comments
Have your say about what you just read! Leave me a comment in the box below.