My DIY Roofing Project
Continued
The text below is the continuation of the story of my DIY roofing project.
Starting the Courses - DIY Roofing
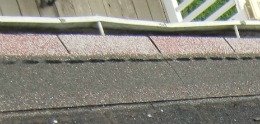
Each horizontal layer of shingles is called a course. The first course you lay down is called a starter course. It sounds a little weird but this first course has the colored tabs cut away, and a couple of inches of the other side is also removed. This will put the sticky part of the shingle very close to the edge of the roof. This is important because this sticky strip will stick to the tabs of the next course, known as the first course.
Every shingle has this little sticky strip just above the tabs. The purpose is the same no matter what the layer. It will hold the tabs in place when the wind blows. Otherwise strong winds will lift the tabs and break them off. This sticky strip may not do its job at first. It is activated with heat, but it only takes a couple of hours of hot sun to create a good stick. Until that happens a new roof is a little vulnerable to wind damage. This is one reason why roofs are put on in the summer.

Back to the starter course. The sticky strip will be be very close to the lower edge of the roof. That was why you trimmed off the tabs: to put the sticky near the edge. You can buy special starter courses that are essentially strips of just the sticky plus enough shingle to give you room to nail. If you nail right on the edge of the roof you are likely to find that there isn’t enough depth to the wood sheathing to hold a nail, so the starter courses have to be at least a few inches wide.
The top edge of the starter course is also trimmed. The purpose is to make sure that the top edge will come almost flush to the bottom of a row of tabs on the old roof. If you didn’t trim them this would create an uneven slope on the roof, where rain or snow might collect, and it might even create an unsightly bump running the length of the roof.
When you lay the starter and first courses down you will start the edge of the shingles flush with the edge of the roof, or you will have the tiles hang over just a little bit. You will do the latter if you have guttering. In that case you will want the shingle to cover up the inner edge of the guttering, so that runoff does not get between the gutter and the house.
After you have put in the starter course for the length of the roof you will now go back and put in the first course. The first course is also trimmed. Only part of the tab is cut away. The purpose here is to get this new upper layer of shingles to align with the old, soon to be under, layer. As with the starter course the upper edge should come almost flush with a course of the older layer.
The instructions that Certainteed provided said to cut away the lower 2 inches of each tab. Once you lay down the first course you will start the second course with a shingle that has been trimmed back so that only 2-and-a-half tabs remain. You can also cut it in half so that 1-and-a-half tabs remain. The part you cut away can be used on the other side of the roof. In this way you avoid losing half of a tab.
I tended to keep my scraps in case I would have need of them later. My DIY roofing project could not afford to waste any shingles. I had a feeling I was a little too tight with my material estimates.
Keeping Straight - DIY Roofing
One problem to overcome is keeping a straight line. If you just lay one shingle down at a time without either marking a straight line first or lining it up in reference to existing shingles you are likely to find that you have a very curvy course of shingles. Enough such courses and your roof will appear to have been laid down by a drunken roofer. If you are very careful you can eyeball everything, but it is easier and safer to snap a straight line with chalked string.
I admit that I eyeballed everything, but I had existing shingles to serve as a guide and I measured frequently. The problem is that you have to measure off something and the edge of the roof isn’t perfectly straight. The shingles extend beyond the edge a little and there may be some variation in how much they extend. So I did end up with some courses that were off a little bit. I also had a relatively short roof to work with so there was less opportunity to mess up.
I put on one course at a time. Some professional roofers work vertically. They will lay down a column of shingles. They have to leave half of the shingle unsecured until after the next column is in place. This will allow them to insert shingles under the previous column. This means they don’t walk nearly as far in the course of shingling a roof, but they have to bend the corners of the shingles up in order to nail down the shingles that they slipped in place. This can result in a tendency for these shingles to curl later.
I have never tried the above technique, I only report it as an alternative to consider.
Moulding and DIY Roofing
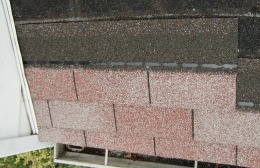
Another difficulty I faced was working the beginning shingles of each course under the moulding at the bottom of my aluminum siding. I thought I might have to remove some of my siding for this project, but discovered that there was just enough room to slip in one more layer under the molding. What a relief!
Shingling the Ridges - DIY Roofing
After I laid down the shingles on the two sides around the flat porch I had to cover up the ridge where the two sides met. With three-tab shingles you don’t buy special shingles, you just cut each three-tab shingle into three one-tab shingles. From the top corner of each tab you trim back at an angle, so that top part that doesn’t show will be a little narrower than the tab. This way the tabs will always cover the edge of the shingle underneath.
This is one of the easiest tasks to perform. You do have to be a little careful to keep the ridge straight, but there is a tiny slit at the top edge of each shingle that aligns with the middle of each tab. Align this slit with the edge of the ridge and your ridge shingles should stay straight.
Safety and My DIY Roofing Project
The task for laying the shingle on the hipped roof was identical except the roof was steeper, and the dropoff was further down. For this task I created a safety harness and used a rope to keep me from slipping off the edge.
I am not afraid of heights, but I am not comfortable with falls. I prefer to stay intact. I intended to save money with my DIY roofing project. One Emergency Room visit would wipe out those savings.
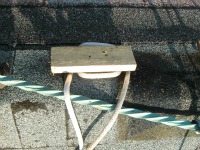
I actually drilled an anchor into the wall just below the roof. The rope was attached to this anchor and ran up to the ridge where I drilled a cleat into the roof and secured the rope to the cleat. It was easy to unwrap the rope at the cleat if I need to adjust the length.
The combination of the cleat and the anchor also provided some backup. A sudden yank on the cleat might have pulled it loose, but the rope would still be secured to the house via the anchor.
The anchor was a chain. I simply used a deck screw and a large washer and ran the screw through the chain and into the wall.
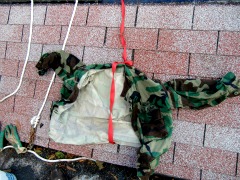
I secured the rope to myself by running a loop of webbing through the back of a very tough Army shirt. The shirt distributed the load if I was to fall. If I had tied the rope around my waist the shock of the pull of the rope would have been concentrated on my waist. This shirt would spread the load across my chest.
It may not look pretty, but it was comfortable and quite reassuring.
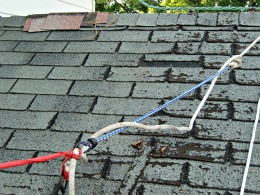
I modified the safety rope by tying a bungee cord to the rope. There was a loop of loose rope at the point where the bungee was tied in. As the bungee stretched the loop would get pulled tight. It was the rope that would bear the weight but the bungee served two purposes. It would lessen the shock of a fall, and it provided feedback to me as I worked near the edge. I would feel the bungee pulling me slightly and that reassured me that my rope was almost, but not quite, ready to keep me from going any further.
A Conclusion to DIY Roofing
I had two special situations with this roof. One, I had a flat, twisted copper lightning rod wire that ran along the ridges. Two, I wanted to install a ridge vent. I deal with both of these in separate articles.
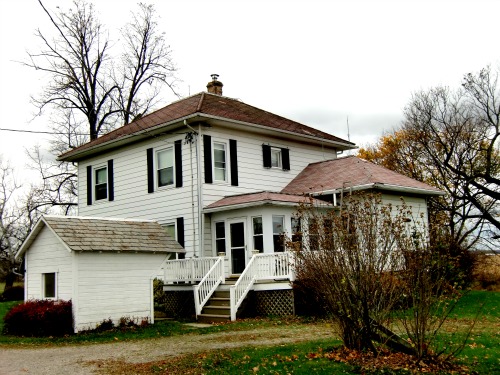
I started this article (on my first page) with a look at my roof before my project. I will close with before and after pics. You can judge if my DIY roofing project was a success.
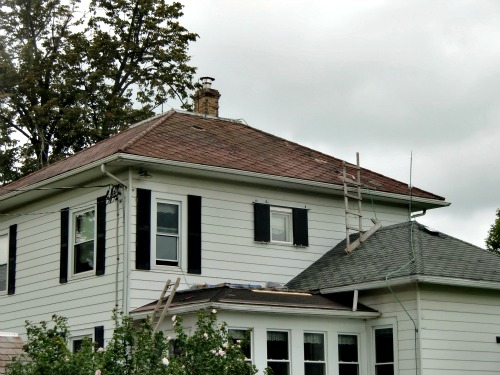
Here is my "Before" shot. I had started on the lower roof, but the kitchen roof is still in its former glory.
Here it is "After". There is still a mismatch, but it is not nearly as glaring.
To Matching Colors on My Pink Roof
To My Roof Underlayment Problem
Please!


New! Comments
Have your say about what you just read! Leave me a comment in the box below.