My Bathtub Refinishing Project
My bathtub refinishing project should have been done 15 years ago. That is how long I put up with worn out porcelain and rust stains bleeding through.
I had this grand vision of having my bathtub reporcelained. But, it weights 400 pounds, it is tiled in place, and it would cost me around $1500. 15 years of dithering had not changed any of those facts, but it had made my wife rather mad.
The problem with writing an home improvement blog, is that your wife expects you to improve your home.

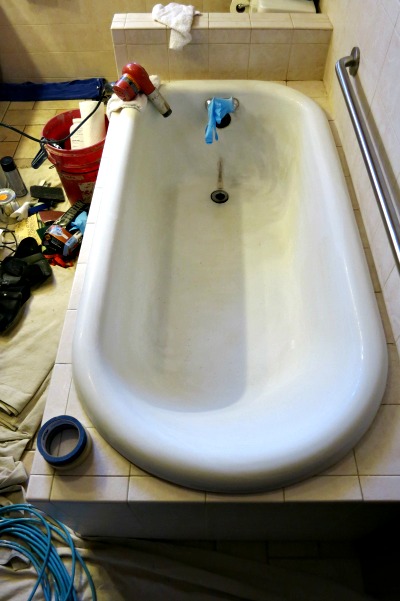
From this angle this bathtub looks disgusting. But when you have seen something everyday for years it doesn't seem so bad. We could bleach the rust stains out. They just kept coming back.

Here you can see that the porcelain is actually missing around the drain.
A Project Considered
When given the ultimatum I realized my time was up. I was going to have to do something.
I knew there were bathtub refinishing contractors in the area, but I am a do-it-yourself kind of guy, so I started out researching the kits for refinishing a bathtub.
It turns out there are several options for guys like me. The kits provide what you need to prep the bathtub, primer for allowing the paint to adhere to the primer, and the paint for the bathtub.
Refinishing a bathtub is a very doable DIY project. However, doing it so it will last is the difficult part, and you won't know until months later whether you did it right.
I have done a lot of house painting, but not any car painting, and painting a bathtub is akin to painting a car. If you don't do it right, people can tell, it won't look right, and it won't last.
That led me to investigate the costs of a professional bathtub refinishing contractor.
The Professional
I live in the sticks, so I expected that I would have to pay for someone to come out from Columbus, about an hour away. With Google I found one in the closest town to me, Bellefontaine, a mere 15 minutes away, and a couple more about 45 minutes away. This meant I had several options, but my call to the local guy set me at ease.
For $325 I could have a professional with 28 years experience do my tub. It would take one morning.
Or, I could get a kit for $40 to $60, spend 9 hours on the job, make multiple trips to Lowes getting things I discovered I needed, like tape and drop cloths, and gloves, and have the nagging feeling that I did it wrong.
Plus, the pro guaranteed his work, and with 28 years in the field, he was going to be around to back it up. I have heard many horror stories of refinishing jobs that did not last. A good number of these were of the DIY variety. While even a pro can have a bad day, if you get a trustworthy refinisher he is likely to be around to correct the problem.
That risks versus the costs made the math pretty easy. I told him to come on over.
The Big Day
My bathtub refinishing contractor, Dave Crissman, arrived exactly at 9 A.M., just as he promised.
He laid out protective drop cloths for the floor, then started prepping the work area.
In my case he had to remove some caulk between the tub and the tile, then he taped off the tile, removed the overflow drain cover, and taped off all the faucets and the drain.
Then he set up his ventilation fan, which he ducted out my kitchen window, as my bathroom window does not open.
The ventilation fan would be required for the spraying process, but it was also nice to have when he broke out the acid wash.
 |
 |
The Acid Etch

The acid is used to etch the porcelain so that the primer and paint will stick. Now my tub had long ceased to be shiny, and felt like it had been etched through all the years of using bleaches and acids to clean it, but his chemicals made sure all of the porcelain was etched, even the curved edges.
The acid clean is easy, but the fumes are strong and burn the lungs, or at least they seem to. This is one good reason to leave this for the professionals. Working that close to the acid isn't pleasant.
Dave wore rubber gloves. If you do a bathtub refinishing project yourself make sure you protect yourself like Dave did.
The Primer
After rinsing off all the acid Dave applied a primer to the bathtub. This was applied by hand. He says it can stick to glass, so it should work on my tub. The primer sticks to the porcelain, while the paint sticks to the primer.
Bathtub refinishing projects that fail, fail because the good bond doesn't develop with the porcelain. The primer is the most important step in refinishing a bathtub.
Preparing to Spray
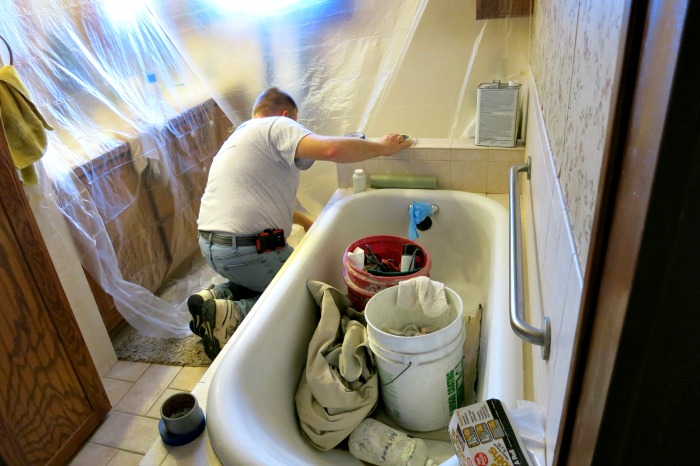
Next, since he sprays the paint on, Dave thoroughly covered every surface in the bathroom and blocked off the doorway.
In this regard refinishing a bathtub is a lot like any other painting job. Protecting what should not be painted is about as important as the painting itself.
My bathtub has a surround of tiled bath panels. If paint got on those I could probably get it off with solvent. People with wooden bath panels might find that removing the paint damaged the surface. The same story applies with wallpaper and other sensitive surfaces. That is why Dave is so careful with his prep work.
This protected all my belongings but it also made it difficult to see what he was doing. I had to lift the camera over the plastic covering the doorway and take pictures from above.
Adding Texture
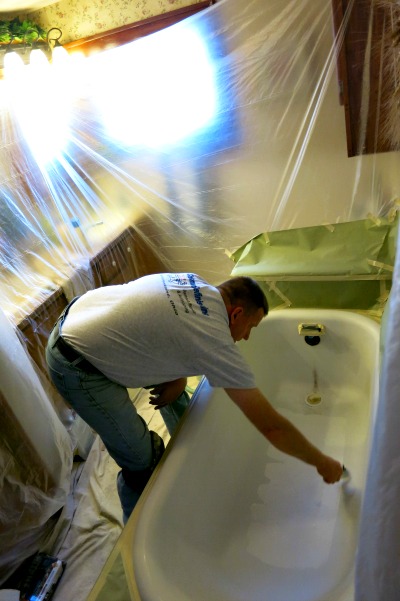
Dave applied a texture layer on the bottom of the tub. This would be coated with the paint, but it would provide a rough enough surface to reduce the danger of slipping in the bathtub.
This was applied by hand.
Looking at my tub now I can tell there is a texture coat, but only because I am looking for the texture. Otherwise I never would have noticed the difference.
Spraying the Paint
Here is where my inability to see through the plastic messed me up. I missed getting a picture of him actually spraying the bathtub.
This is the smelliest part of the job. It isn't a harsh, burning smell, like the acid. It is a rather pleasant, sweet smell, but it is strong. For those with sensitive noses, like my wife, it is best to be out of the house.
Unfortunately the smell will continue for many hours afterwards, as the solvents evaporate from the paint.
Dave says that he applies four layers of paint when refinishing a bathtub.
He started at 9 am, and walked out of the house at noon.
Most of his time was in prep, and doing the acid wash and the primer. Actual painting time probably was less than an hour.
The Results

When he finished his cleanup and I got a peak at the bathtub I was astounded. I had never seen it so white.
There is a difference between the porcelain coat and the paint coat. When porcelain is baked on you end up with a smoother finish. The paint leaves a somewhat mottled surface. This is called an "orange peel" surface. It is a common result of solvent based systems.
In the auto world most car companies are able to limit this orange peel effect. When you get your body repaired after an accident, the paint job from the shop will have a stronger orange peel effect, so that you can tell the difference between the factory paint and the repair paint, not by the color, but by the texture.

My bathtub now has an orange peel surface. This isn't bad. It looks great. But you need to know to expect that when you get your bathtub refinished.
Since the whole tub was done there isn't any difference. It all looks the same, so you have to be pretty picky to really care. But if you are insisting that your bathtub look exactly like it did in 1906, you might need to pay more. I think it is possible, with lots of sanding between coats, but the price will go up considerably.
The bathtub takes 24 hours to dry to the point where I can use it.
Since it is an epoxy coat and not porcelain I can't use any abrasive on it. Dave gave me a list of cleaning products that I could use.

Since the copy is too small to read let me highlight the important points.
Dave recommends I follow up my bathtub refinishing with a coat of automotive wax buffed to a high shine. It is not critical but will help maintain its shiny appearance. Just don't wax the textured bottom surface.
Never use abrasive cleansers. Even Softscrub is a no-no.
Dave says these products are safe after a bathtub refinishing:
Top Job, Mr. Clean, Liquid Spic and Span, Fantastic, Scratch Guard, Lestoil, Liquid Ajax, Formula 409, Dow Foam, Bon Ami, shampoo, and dish soap. Check out the products label. Many will say whether they are safe for acrylic or refinished bathtubs.
Conclusion to Bathtub Refinishing
I am quite pleased with the finished job, and I am quite sure that it was worth the money to have a professional do this job.
I have some friends who paint cars for a living. I am quite sure that they could handle a bathtub refinishing project. For those whose paint skills are limited to bedroom walls, I think calling Dave is your best option.
To Top of Page - My Bathtub Refinishing Story
Home - All About House Design
Please!


See my Architectural Design Principles Sections
See my Greek Revival Sections
Solve your Garage Door problem here
Investigate the Georgian Style here
See the old Victorians here
Confused? Try my Architectural Dictionary
Tired or Suburbia? Check out your alternatives here
New! Comments
Have your say about what you just read! Leave me a comment in the box below.